Logo image

Using eBooks with Runestone Academy: The PreTeXt Interactive Edition

Chapter 4 Managing Your Course

Section 4.1 Managing Students in your Course

Subsection 4.1.1 Student Self Registration

When you created the course, you chose a project name. Give that text string to students. They will register on the site and enter that string as their course name. If you’ve forgotten what the string is, you can see it displayed on the Course selection page https://runestone.academy/runestone/default/courses 1 . You can access that page by clicking on the person icon at the top right of the window and then selecting Change Course.
Note 4.1.1.
Students will register for a course following the same procedures that were described Chapter 2. You just need to provide them with the text string for the course name.

Subsection 4.1.2 Pre-register your students

You can also pre-register your students by creating a CSV file and uploading that file through the instructor interface. Pull down the 👤 menu and Choose Instructor Page then click on the button for Manage Students. You will see a page like this:
Figure 4.1.2. Register your Students
You can create a csv file in your favorite spreadsheet program and then export it to a csv or you can simply edit a textfile, whatever works for you. But note that some versions of Excel add a lot of empty columns and rows that really confuse our importer! Please check the csv file in a text editor before you upload it to runestone. Also note that if the csv file has any problems, like a duplicate username, nothing will be changed on the runestone server. The format of the file MUST be as shown in the figure.
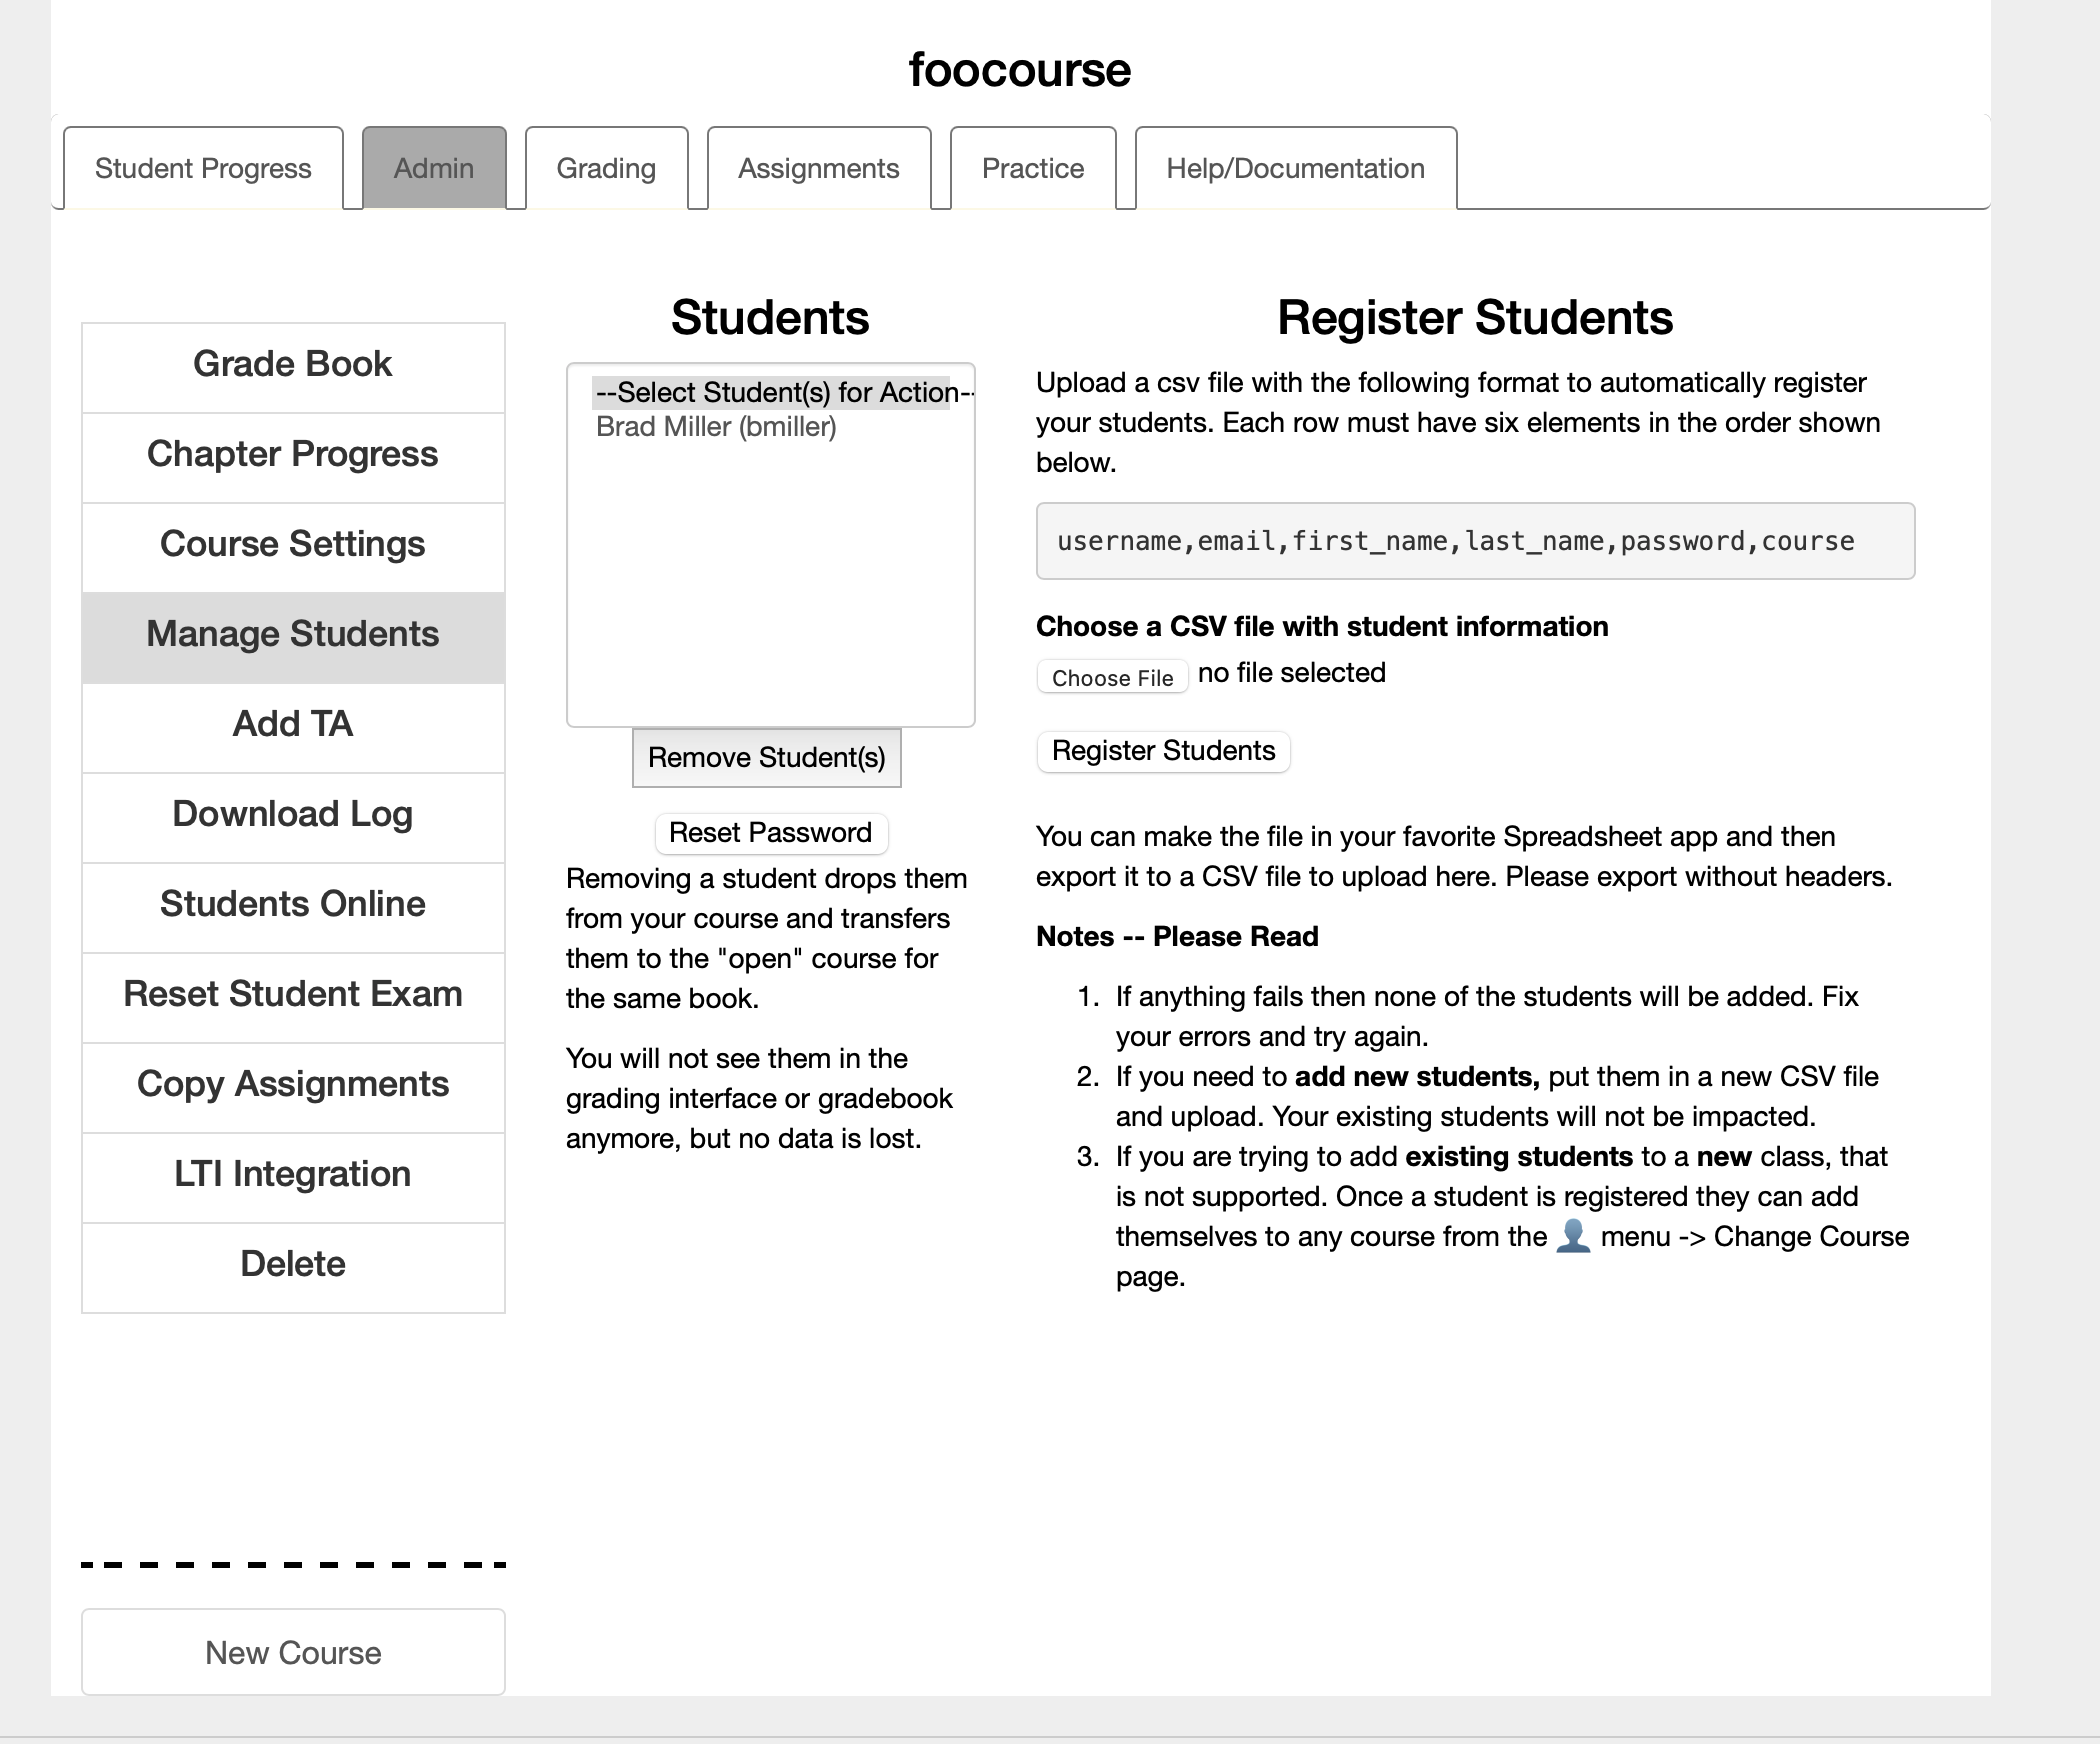
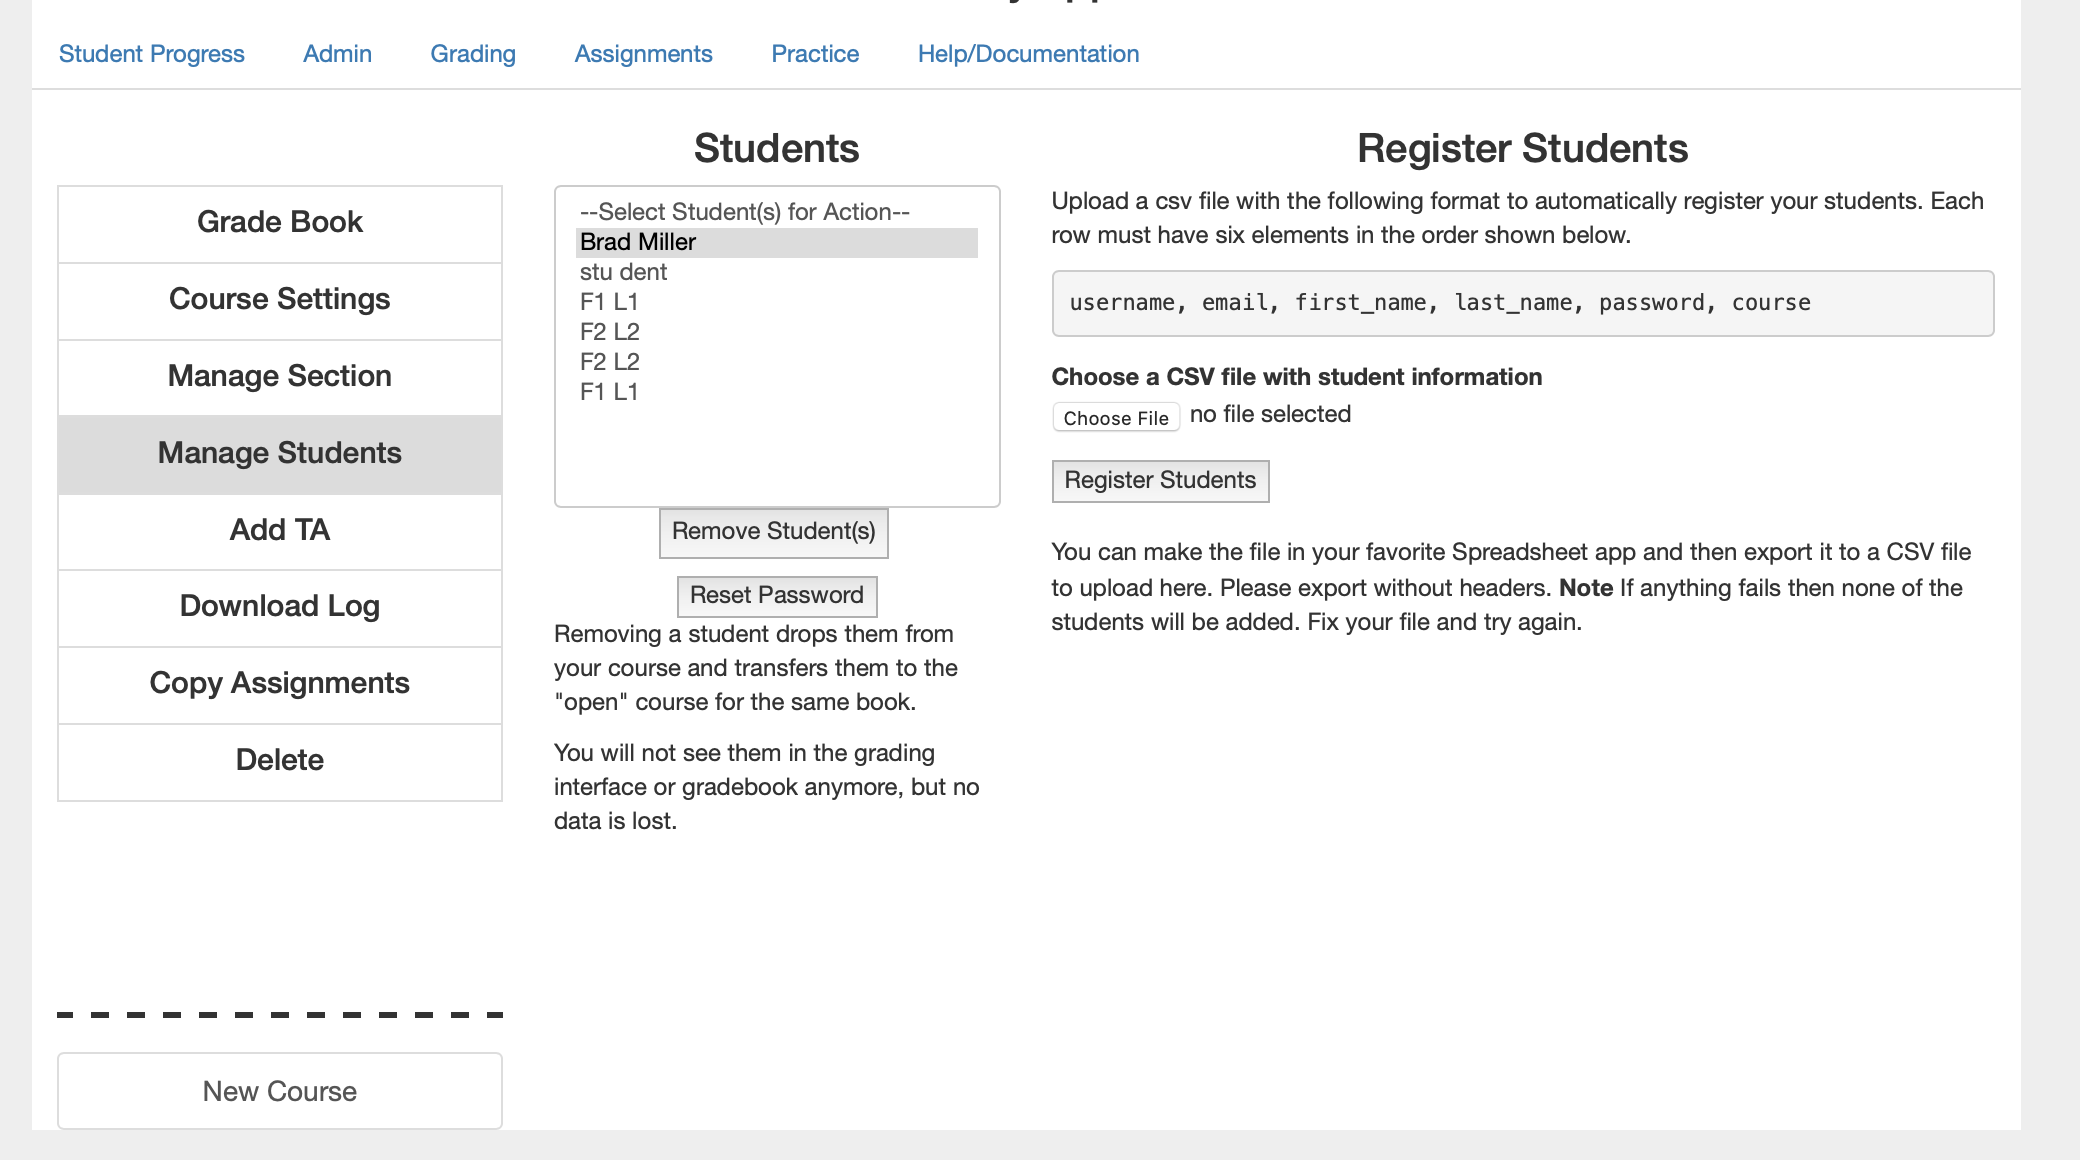
username,email,first_name,last_name,password,course
user1,user@school.com,Jane,Smith,xxxx,foocourse
Notice – There are no spaces after the commas. Excel is horrible at exporting it will add extra blank fields and lines that look like ,,,,,,,, Once you export from excel its best to clean things up in your favorite text editor.
When the file is created you can choose it and upload it to Runestone. It will verify the fields and if there are no errors it will register the students. The most common error is that the username is a duplicate. Usernames are the primary way we identify students and they must be unique. With over 120,000 students in the database there are bound to be duplicates. This is not a bug, it is a sign of growth.
If you add students to your class later you need to create a new CSV file just for them (or have them register themselves). Adding students to the end of your previous spreadsheet will result in lots of error messages about duplicate usernames.

Subsection 4.1.3 Removing Students

You may also have noticed the "Remove Student(s)" button in Figure 4.1.2 This allows you to remove a student from your course. Although it seems self explanatory the reason to bring this up is to explain what happens to the student account when you remove them. The account is not deleted but rather the student and their work is moved to the base course. This allows a student to have access to their work and to continue working independently if they wish. As an instructor you do not have the capability to delete a student account. But anyone can delete their account and all of the information saved for that account by using the 👤 menu choosing edit profile.

Subsection 4.1.4 Resetting Passwords

There is no doubt about it, password management is a headache for everyone. Runestone handles hundreds of password reset requests each week. But that does not always work. Some schools (inexplicably) block email from Runestone. Other schools run software that simply mangles the URL’s found in emails that look like they are password reset emails. This is understandable to some degree as Phishing scams are so common, and its important to protect the students. I’ve done everything I can do from my side to validate the runestone.academy email domain. But, other times students simply type in their email incorrectly.
You may be get around some of these problems by asking your school to allow mail from runestoneinteractive@gmail.com to go through. If your IT department is not cooperative then your students will have to come to you to have their password changed. You can reset the password for any of the students in your course. Just select the student from the list and click the reset password button. I cannot respond to emails asking me to reset passwords, I don’t have the time to do that, and I do not have a reliable way to verify that those requests are legitimate. Yes many high schoolers think it is funny to try to trick me into resetting the password on one of their friends.
Instructors cannot change their own passwords through this mechanism. who among us hasn’t walked away from the computer and left ourselves logged into Runestone? As an instructor, you will still have to use the normal email password reset mechanism. If your school blocks emails then I suggest you just get a free gmail address to use for this purpose.

Section 4.2 Privacy and Runestone

In this week’s update I want to tell you about some new account management features I added to Runestone, and give you some idea about how you could set up your class if you don’t want Runestone to capture any Personally Identifiable Information (PII) about your students.
Runestone collects a lot of data. I think it is all justified, and if you are an instructor you can gain some real insight into how your students are doing based on the data we collect and the reports we create for you. None of that requires any PII about your students. Yet we do collect some… what do we collect? and why?
Here is what we we ask for when a student registers:
  1. username - this can be anything and it is easy for this to NOT contain PII
  2. email - This is the only reliable way to do password recovery.
  3. First Name and Last Name - this has always been just for the instructors so that when they are grading assignments or looking at analytic reports, they know who they are looking at.
  4. Password - encrypted and stored securely.
  5. Name of the course. The instructor has full control over this call it whatever you want.

Subsection 4.2.1 Setting up a class with no PII

We will walk through two strategies for managing a Runestone Course that doesn’t store any PII about a student. The first strategy has the students register themselves following the instructions I’ll tell you about. The second strategy puts you in complete control and allows you to create all of the usernames for your students!
The way to use Runestone without PII is to ensure that your students choose a username that they remember but has nothing to do with their real identity. They can also put in fake first names and last names.
The real trick is how to manage password recovery Thats where this cool email alias trick comes in. Most email systems (including gmail) support the username+alias convention. That is you can add a + and an additional alias to your email address. For example runestone+support@gmail.com or runestone+info@gmail.com both of those emails will end up in the runestone mailbox, but I can also see the alias. We can use this feature so that students don’t have to enter their real email address, they enter yours plus their username as the alias. This means that you will end up fielding the password reset emails. If you are an email whiz you can set up some rules to forward these to the right student.
Experience has shown that having students register themselves and get all of those pieces correct is a losing battle. So why not put you in charge of registering them? Get out your favorite spreadsheet app and prepare a file with your students information.
You can upload a CSV file with the following format: One row for each student
username,email,first_name,last_name,password,course
In order to protect your students privacy you can create a spreadsheet like the following:
hogwarts-1,dumbledore+hogwarts1@gmail.com,F1,L1,owls4all,potions_fall19
hogwarts-2,dumbledore+hogwarts1@gmail.com,F2,L2,owls4all,potions_fall19
hogwarts-3,dumbledore+hogwarts1@gmail.com,F2,L2,owls4all,potions_fall19
Note 4.2.1. Note.
It is important that you check your CSV file and make sure there are NO SPACES before or after the commas!
From the Manage Students tab on the Instructor’s Page, you can now upload this CSV file using the interface.
Figure 4.2.2.
Once you have uploaded the CSV, you can add some columns to the spreadsheet that contain the real student information to help you remember. You will probably learn quickly who your made up names correspond to, and can probably think of something anonymous that will help you remember who F1 L1 really is. On the first day of class you may want to hand out paper for the students with their username, and walk them through changing the password, or maybe you want to assign each student a unique password when you are making up the spreadsheet. I just would not recommend a scenario where all the students have the same password.
Of course all of this is optional. You can also create a csv file with usernames of your choice and include the real email addresses and real first / last names of your students, or you can have them register themselves as students have been doing on Runestone since 2012.

Subsection 4.2.2 What other Data Does Runestone Collect

Here is a graph of all of the events that runestone has collected in the last 4 weeks.
Figure 4.2.3.
As you can see that is a lot of activecode and a lot of pages loaded. Also over 1 million multiple choice questions answered! I would love to see more clickable area questions and more fill in the blanks. Some of our preliminary research shows that those kinds of questions are much more effective at getting students to review the content in order to get a correct answer, rather than simply clicking on different answers until they guess correctly for multiple choice. All of these events are captured and tied to a username. So the more anonymous your username the better as far as I’m concerned.
What I’m really interested in is figuring out how to apply machine learning algorithms to help identify students that may struggle, to help weed out bad questions, to help us write better questions, to help us order the textbook in different ways, to adapt to each student to help them achieve their maximum potential.
Runestone also collects the source code each time your student changes and runs the code in an activecode activity. This is to provide a timeline for the student as well as for yourself.
  • Make sure you explain the timeline to your students. Sometimes there is great fear in them about changing code that is working. Having this timeline present encourages them to experiment, knowing that they can always get back to a good working version.
  • For you the timeline can be an invaluable tool for talking through an assignment with a student. You can see their progress and if they make a wrong turn you can usually see that in the timeline and talk to them about why they decided to a particular direction.
  • The timeline is also available in the scratch activecode which some students like to use as a notebook for the course.

Section 4.3 Integrating with your LMS

Subsection 4.3.1 Introduction

Runestone provides a rudimentary LTI integration using LTI 1.1. So far we have made this work very successfully with Canvas, Moodle, and Brightspace D2L. Others may or may not work. I call this a community supported feature of Runestone because LTI is a huge pain to work with, and it is very difficult to get access to and test against whatever LMS your school has chosen.
When you use LTI your students do NOT and should not register on Runestone Academy, the LTI interface registers your student with Runestone the first time they access it from your LMS. In addition, Instructors need to use one of the LTI links to your book in order for grades to transfer.

Subsection 4.3.2 Phase 1 (All LMS platforms)

Generate a shared/secret key pair for use with Canvas:
  1. Browse to the 
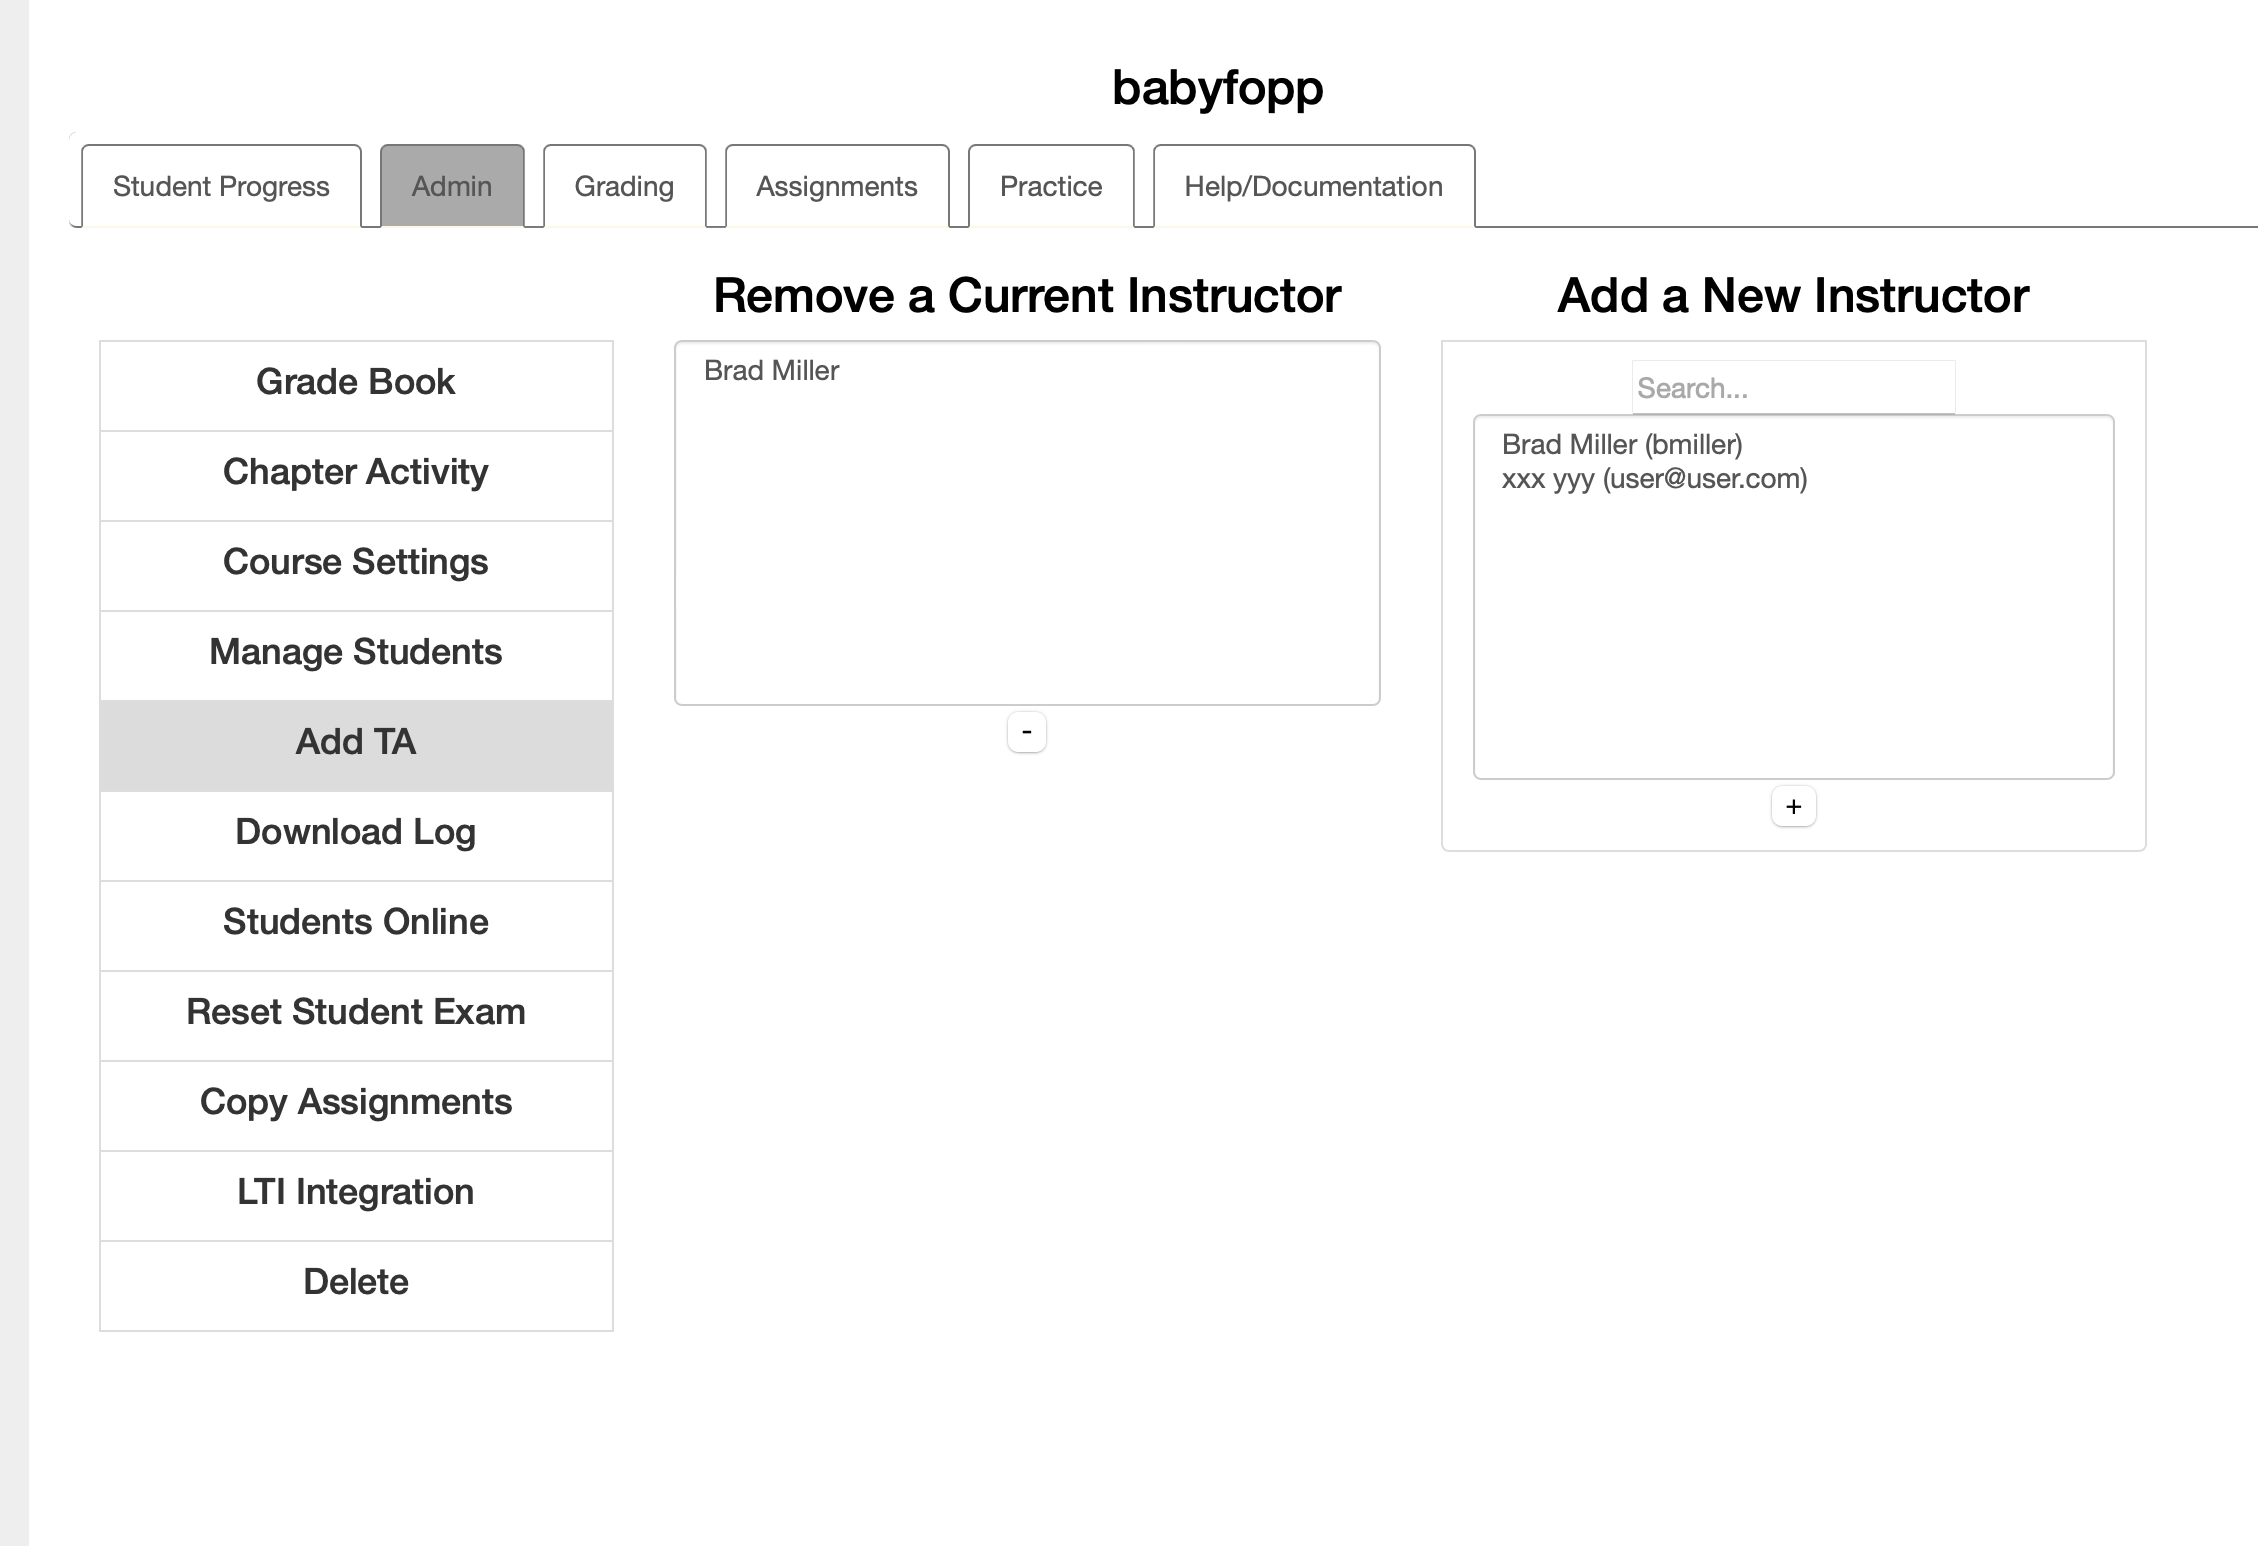
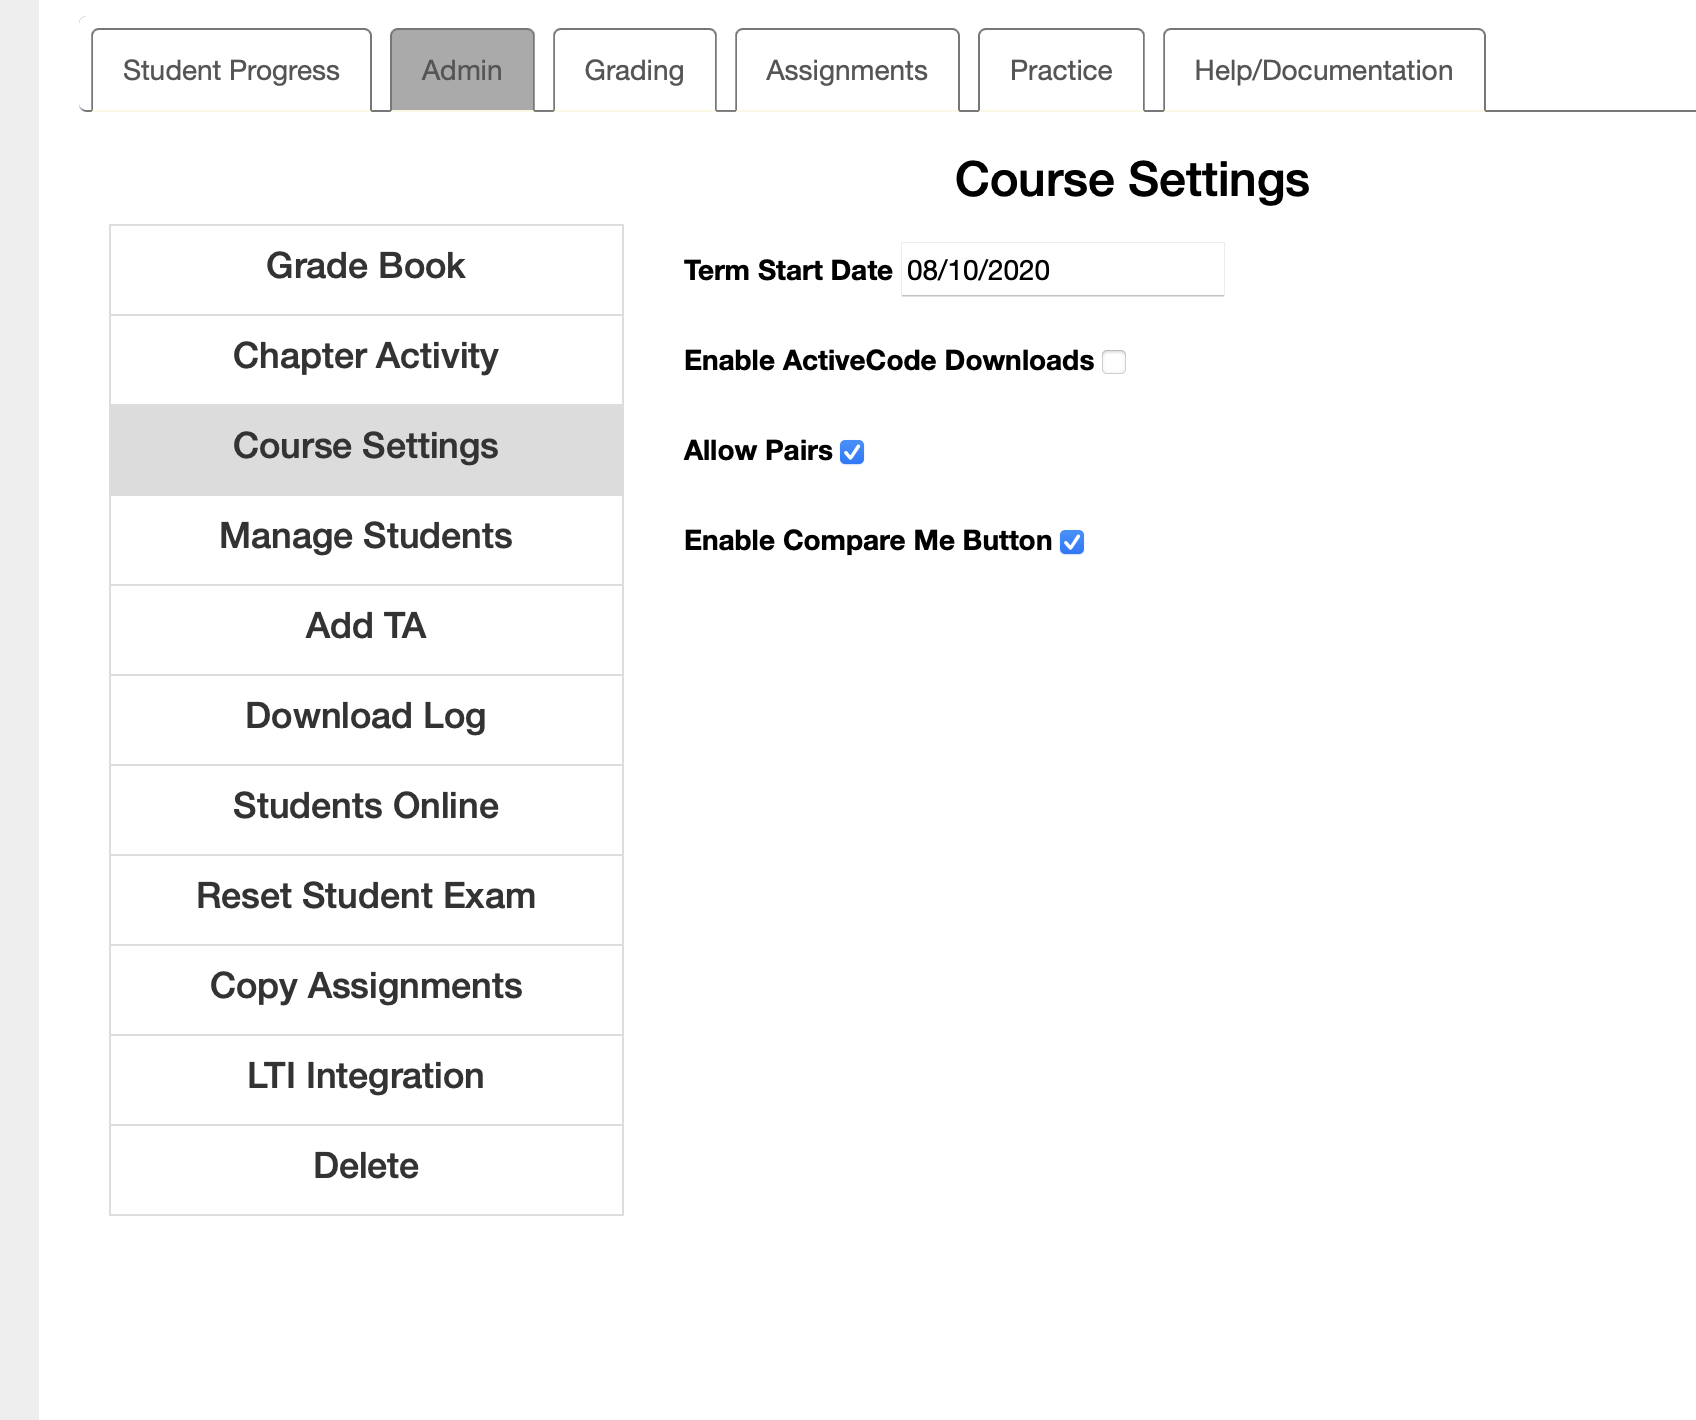
Runestone Academy and log in, then select your course (you must be the Instructor).
  2. Browse to the Instructor's Page , then click on “LTI Integration” in the Admin tab.
  3. Click on the Create LTI Key and Secret button. Click the Show Secret button. You will use these in the next phase.

Subsection 4.3.3 Phase 2 (LMS-specific Steps)

Follow instructions for your LMS:
Subsubsection Canvas
  1. Follow the 
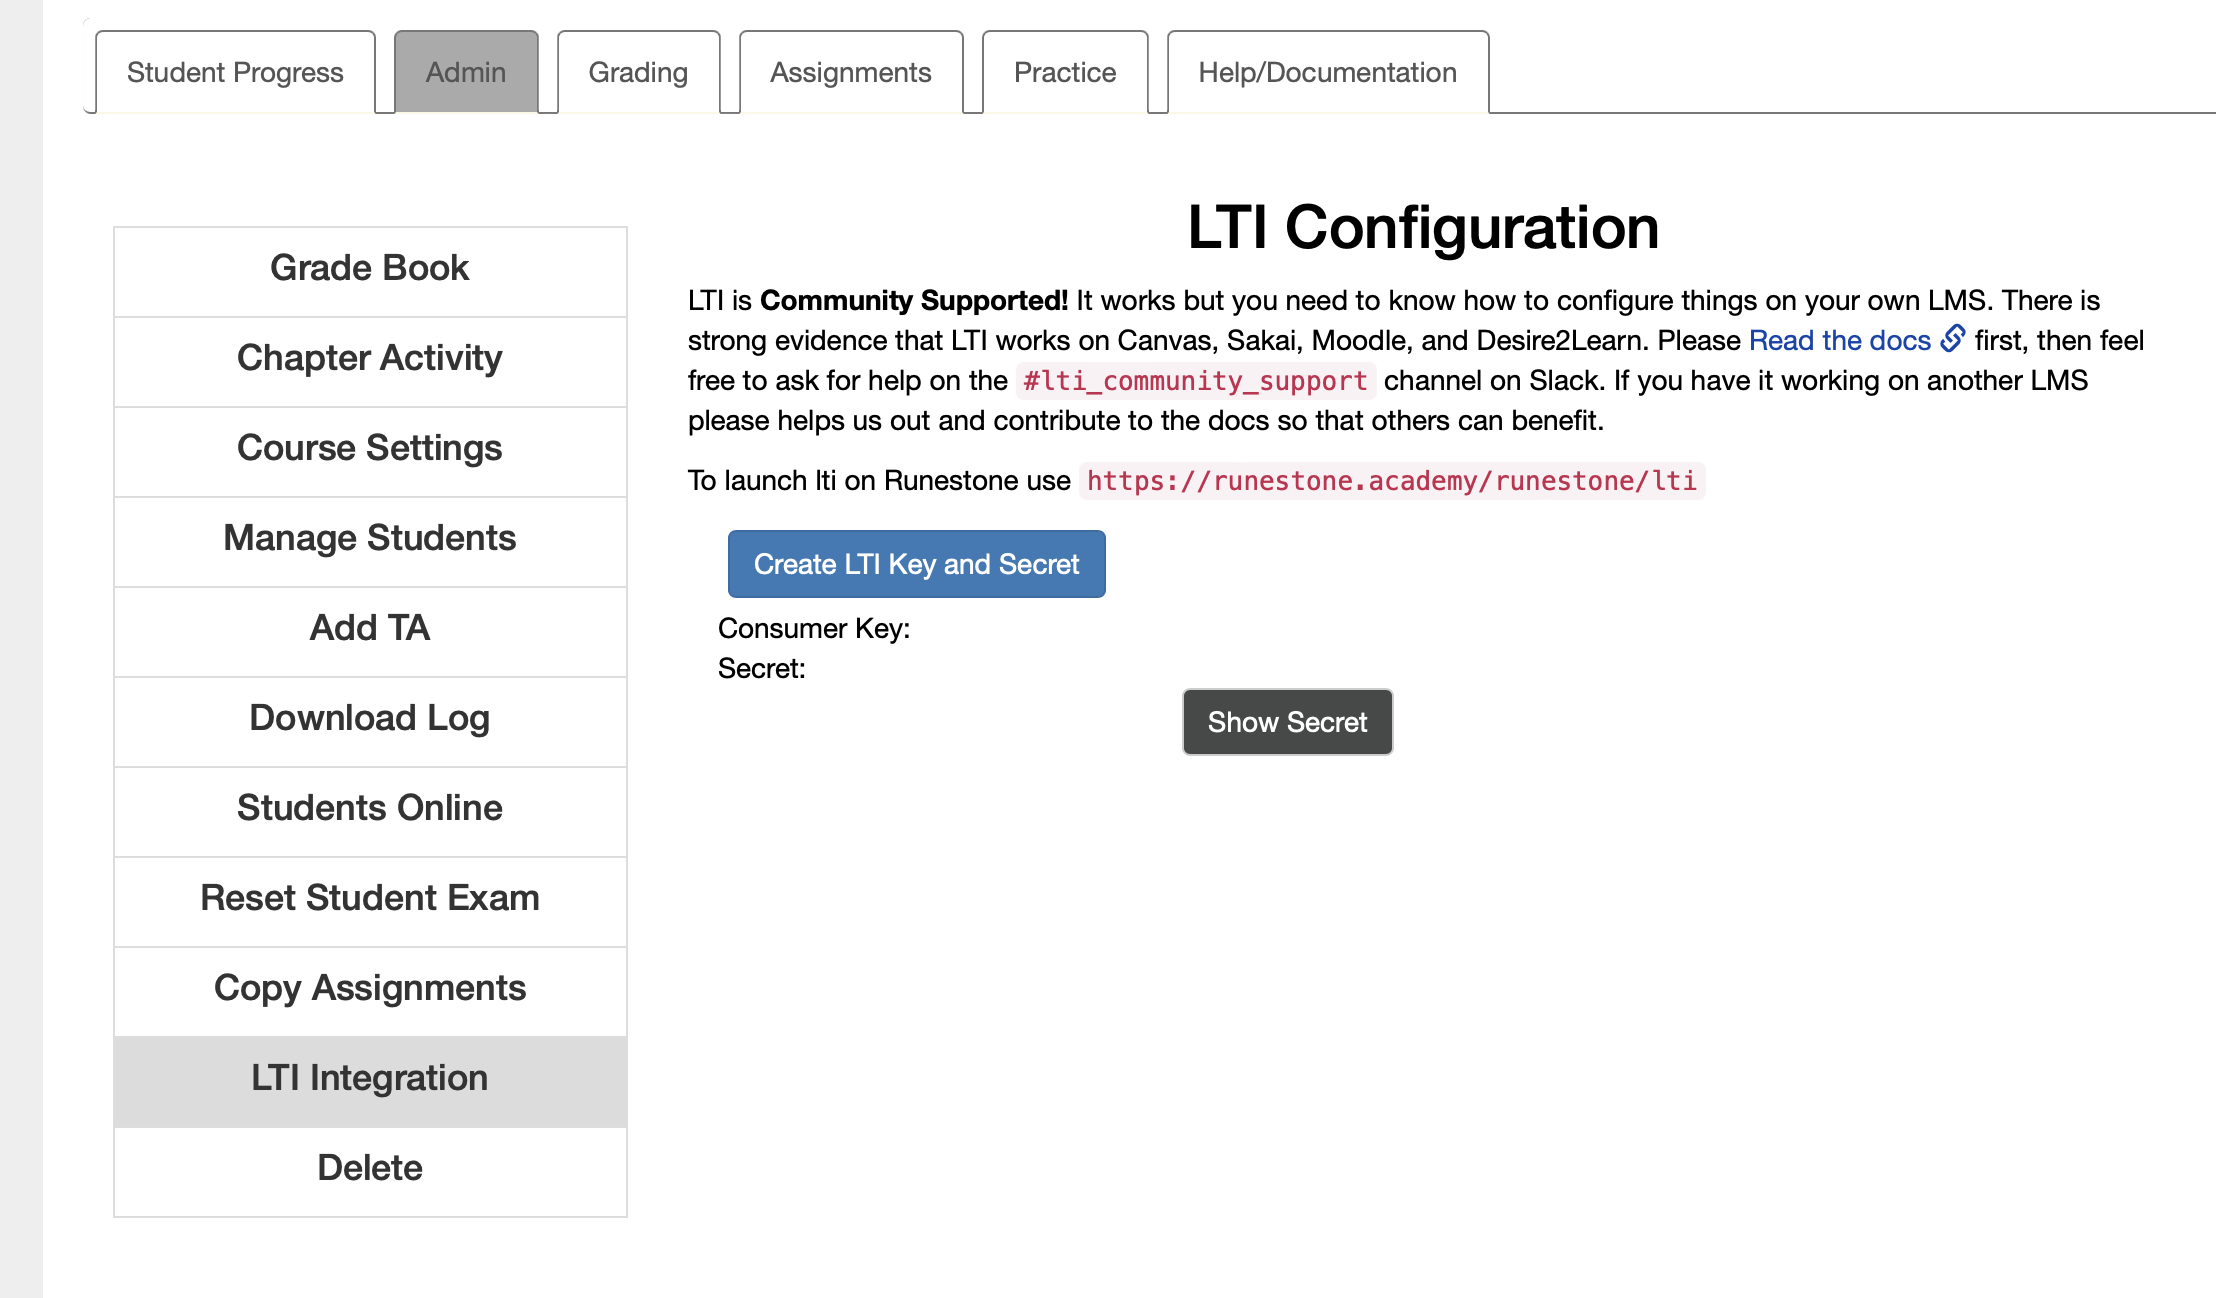
Canvas instructions to add an external app:
    :Name: Runestone
    :Consumer key: Enter this from Phase 1.
    :Shared Secret: Enter this from Phase 1.
    :Launch URL: ``https://runestone.academy/runestone/lti``
    :Domain: Leave blank.
    :Privacy: Select Public; otherwise, Runestone won’t work.
    :Custom Fields: Depends on the installation type:
    
        -   For a site-wide installation, or for installing the Runestone external app for use across multiple courses, leave this blank.
        -   If installing for a single course, add ``custom_course_id=xxx``, where ``xxx`` is the Runestone ID of the course (visible in the upper lefthand corner of each page in your Runestone course).
    :Description: Interactive textbooks from Runestone Academy
    
  2. Add an assignment in Canvas that uses the Runestone external tool:
    1. At `Runestone Academy`_, create an assignment; be sure you’ve checked the “Visible to Students” box and saved that change.
    2. Still on the assignments page, copy the LTI link.
    3. In Canvas, add an assignment. For the submission type, select “External Tool.” For the External Tool URL, use the LTI link you just copied. You’ll have to manually enter the same due date/time and a similar assignment name; these aren’t copied automatically. You must be sure the Load This Tool In A New Tab checkbox is checked.
    Students can now click on this assignment and work it. **If they don’t click on the assignment, they won’t receive a grade.** When the assignment is due, go to Runestone directly from your Canvas course by using an assignment link. Otherwise, grade reporting won’t work. In the grading tab of the instructor interface, grade the assignment, then click the “Release Grades” button. Doing this will push all grades to Canvas.
Subsubsection Moodle
  1. The following instructions are for Moodle, but should work for any LMS with LTI Support. Please note that certain items may have naming variations (ie. Moodle External Tool / Canvas External App).
  2. In Moodle, create a new external tool called "LTI Login Link".
    :Name: Login to Runestone
    :Tool URL: https://yourHost.blahblah.edu/runestone/lti
    :Consumer key: Enter the key you copied for `consumer` from Phase 1
    :Shared secret: Enter the key you copied for `secret` from Phase 1
    :Icon URL: https://yourHost.blahblah.edu/runestone/static/images/logo_small.png
    :Share Email: True
    :Share Name: True
    :Custom params: custom_course_id=xxx, where xxx is the Runestone ID of the course (visible in the upper lefthand corner of each page in your Runestone course).
    
  3. Login to your Runestone instance with the tool just created, and create your class as well as your assignments.
  4. In Moodle, create a new enrollment external app directly to your course and assignment. You will need to repeat this for each assignment. You will also need the database values for your course ID, and assignment ID. Get these from step 2.2. Please note that in order to receive roles and grades, "Accept Grades" must be checked in Moodle. In other LMS’s this may be referenced by a "Share IMS Names and Roles" or similar.
    :Name: Assignment 1
    :Tool URL: https://runestone.colorado.edu/runestone/lti?assignment_id=&custom_course_id
    :Consumer key: Enter the key you copied for `consumer` from Phase 1
    :Shared secret: Enter the key you copied for `secret` from Phase 1
    :Icon URL: https://yourHost.blahblah.edu/runestone/static/images/logo_small.png
    :Share Email: True
    :Share Name: True
    :Custom params:
    :Accept Grades: True
    
  5. Copy the tool as many times as you need within your Moodle Course, updating the Name and Tool URL each time.
  6. Students can now click on these external tool assignments to be enrolled/logged directly into your Runestone course and assignment. The grades should appear in Moodle once they are released in Runestone through the Instructor interface.
  7. The course instructor must also be an LTI sourced user, so use the "LTI Login Link" URL. This can be hidden for users.
Subsubsection Brightspace D2L
Depending on how D2L is set up, you may need to be an administrator in order to set up your links for class. However, in some setups, instructors have permission to make their own LTI links.
  1. To check, while in your class on D2L, you can go to Course Admin - External Learning Tools, then click the Manage Tool Links (Legacy). From there, click the New Link button.
  2. If that is successful, then here are the settings. (Otherwise, talk to your LMS Admin to configure this for you)
    Title
    Enter either the Textbook Name or the assignment name on Runestone
    URL
    copy this from the LTI configuration panel for the textbook login https://runestone.academy/runestone/lti or from the individual assignment in the Assignments tab of the Instructor’s Page.
    Description
    Leave blank or add a description.
    Visibility
    Allow users to view the link should be checked.
    Key/Secret
    Signature
    check Sign messages with key/secret with
    select Link key/secret
    then fill in
    Key
    Enter this from Phase 1.
    Secret
    Enter this from Phase 1.
  3. Click the Save button before adding custom parameters.
    Custom Parameters
    click the Add custom parameters link.
    Name
    custom_course_id
    Value
    the Runestone ID of the course (visible in the upper lefthand corner of each page in your Runestone course).
    Security Settings
    Select use link security settings
    Make sure at least the following settings are checked:
    • Send tool consumer information to tool provider
    • Send context information to tool provider
    • Send LTI user ID and LTI role list to tool provider
    • Send user name to tool provider
    • Send user email to tool provider
    • Send link title to tool provider
    • Send link description to tool provider
  4. Once everything is selected, click Save and Close
  5. Now, from anywhere in your course, you can select Existing Activities - External Learning Tools and then the link you created. After adding this link, make sure that you make sure the link is configured to Open as External Resource. That way the right information will be passed to the textbook.
  6. Students will be able to click on this link when you make it available to them. If they don’t click on the assignment, they won’t receive a grade, so when you make the assignment on runestone, you probably want the Visible to Students checkbox to remain unchecked. This way it will only be available from the D2L link.
  7. When the assignment is due, go to Runestone directly from your D2L course by using an assignment link. Otherwise, grade reporting won’t work.
  8. In the grading tab of the instructor interface, grade the assignment, then click the Release Grades button. Doing this will push all grades to D2L.

Section 4.4 Add and Instructor or TA

Runestone supports multiple instructors or TAs for a course. We do not make any real distinction between a TA and an instructor so keep in mind they they both have all of the same privileges that you do. Adding a another instructor is quite easy. The process is as follows.
  1. Make sure that your co-instructor has registered for your course as a student.
  2. Go to the instructor page and select the Add TA tab as shown below
  3. Select the co-instructor or TA from the list of students on the right then click the + button below the list. You should see the name appear in the list of instructors on the left.
To "demote" a co-instructor or TA back to a student just select them in the list of instructors on the left and click the - button below the box.

Section 4.5 Course Settings

There are some settings that you can control for your course that effect how the interactive components work. You can modify these on the course settings tab of the instructor interface.
Term Start Date
You can change your course start date. This is important if you copy assignments from a past term. Runestone will try to make the assignment due the same number of days from the start of the term. We also do analysis of student performance based on the week of the course, so it helps our analysis if this date is accurate.
Enable ActiveCode Downloads
If this box is checked then each activecode will have a download button that will allow your students to download a text file with the appropriate extension containing the code in the editor.
Allow Pairs
This enables a simple pair programming feature that allows a student to type in the username of a partner. When the student clicks the Save and Run button the code will be saved for both students with a comment added that indicates they were working with a partner and who that partner was.
Enable Compare Me Button
Questions such as multiple choice may let students see how they did compared to other students in the class. This button pops up a dialog that shows the percent of students that answered a question for each option. For a fill in the blank question it shows the top 10 answers.
https://runestone.academy/runestone/default/courses